Monthly Archives: February 2016
From The Heart Stamps Sketch #141
Hello friends! Happy Monday! I’m here with this weeks sketch challenge at From The Heart Stamps. These are great challenges because you can use just the sketch, or if you’d like, add the twist. The only requirement is that you use a From The Heart image – the rest is up to you. The twist for this challenge is to make an easel card! If you’ve never made an easel, here’s a great tutorial from Split Coast Stampers.

I used only the sketch this week and turned it around for fun. My image is called, “Precious Gift” which I colored up with Sakura Glaze pens. These are so luscious. The design paper is DIY by Simple Stories. I finished off with some faux stitching and a few enamel dots.

You have until Sunday, March 6th to enter Sketch #141 at From The Heart Stamps. Hope to see you there!
The House That Stamps Built; Project for the week of 2/29/16
Hello stampers. Kathy, The Crafty Nurse here “leaping” into some fun background techniques this month for my project of the week at The House that Stamps Built! I hope you’ll find some helpful information in my post today that helps you move forward on your crafting journey.
I have always love techniques and playing with inks. I found that Copic Various Refills have the same properties as regular adirondack alcohol inks so any technique you do with those, can be done with Copic refills. I’ve listed just a few of my favorites.
Lets get started!
For this project the supplies you’ll need are:
- Copic Various Refills (or any other alcohol inks)
- Copic Markers
- Copic Colorless Blender
- Glossy or Specialty Stamping Paper
- Vellum
- 91% Alcohol
- A Straw
- A Dropper
- Cotton Squares
- Repeat Impressions Stamps of your choice, I used: 6113-K, Life is not, 5613-G Dream Calligraphy, and 5806-H Happiness
- Stamp-a-ma-jig – optional

Copics on Vellum (BG49 & RV25)
Begin with BG49 at the bottom of a strip of vellum. I would recommend using a piece larger than you actually need. With good consistent pressure, color back and forth to the midpoint of your vellum.

Next, take your colorless blender and soften out the BG49 toward the top.

Then, reverse the strip of paper and from the other end begin doing the same with your RV25. You can see that it is beginning to create a third color in the middle as they mix together.

Then bring back the colorless blender again to go over the entire piece.

Do not be alarmed when you get ink that transfers to your colorless blender. It’s not ruined. Simply color back and forth on clean scratch paper and it will be good as new. You may still see color, but it won’t come off on your next project.

To clean up your work space, grab the 91% alcohol and spray it liberally, then pick up with paper towel or cotton square.

Here is the vellum panel stamped with Repeat Impressions “Life is not 6113-k”

The next technique is so easy, but makes an impressive background. The key to getting great movement with alcohol inks is using either glossy card stock or specialty stamping paper by Ranger.
Start by placing drops of various refills on a non-porous surface. I just used my craft mat to dot random patterns of the three ink refills. I then took a spray bottle with 91% alcohol (you can get this at Walmart or any pharmacy store), and gave 3 good sprays.

Then, dip your glossy card stock into the ink and viola! You can leave it like it is, or keep dipping until you are satisfied.

The next technique drops ink directly on the paper. You can use vellum, glossy, or even transparencies.

After applying the ink droplets you can spray with the 91% Alcohol to get movement.

This next technique also uses ink direct to paper, but adds even more movement by blowing through a straw when the ink is still wet. You must work quickly as these inks dry fast!

This next technique uses a pipette filled with 91% alcohol to drip small amounts over a copic colored background. This would be great for water scenes.

Finally, here are the creations I made during my creative play today. I hope you’ve gotten a few tips and tricks this week at The House That Stamps Built and we look forward to seeing your cards in our current challenge this week.

Simon Says Sparkle

Hello Hero Friends!
Kathy, The Crafty Nurse here today with my collaboration card share with Simon Says Stamp. If you are ever looking for me you can always check my Simon Says Stamp cart, because I’m usually there buying up the store!

I’ve been a long time Simon Kit Club member and I couldn’t resist using the Sparkle & Shine stamp set by Kristina Werner. For the technique, I popped over to Jennifer McQuire’s Blog for her background embossing techniques.

I like the look of a circle cut out from the side and popping up the card panel for dimension. I used a Perfect Medium Pen to emboss my heart with some of that sparkly Enchanted Gold powder. The flags were cut out of additional embossed pieces using a My Favorite Things fishtail die.

The month is coming to an end very soon, so I hope you’ve gotten your card entered for this month’s chance at the Simon Says Stamp gift certificate. Keep sparkling!


Sketch Saturday Challenge #401
Happy Saturday! Today’s new Sketch Saturday challenge is sponsored by Bugaboo who is offering the randomly chosen winner 7 images from their site! How generous! You have until Friday, March 4th for a chance to win.
Here’s the sketch:

For my card I chose “Ringlet Kidz Topper”, which I colored with Copic Markers. The paper is Simple Stories “DIY Boutique.” The cross stitch die is from My Favorite Things and the ribbon is by Ellen Hutson.

I can’t wait to see what you come up with using the new Sketch Saturday Sketch!
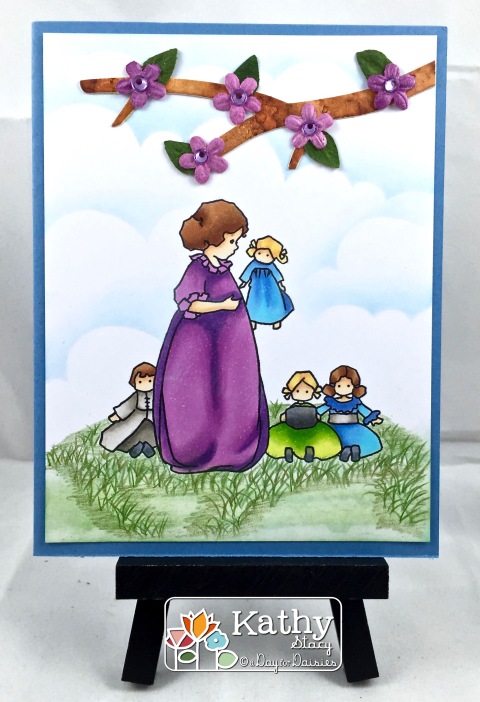
A Day For Daisies: Add Flowers Challenge Showcasing “It’s a Child’s World 2-26-16
It’s Friday! Yeah! We are starting a new challenge at A Day For Daisies and adding some flowers to our projects this week. For our images, the design team is showcasing images from “It’s a Child’s World.” The challenge will run through Thursday, March 10th at noon on the A Day For Daisies Blog!
For my card today I used the sweet image called, “Dolls Margaret Evans Price Style.” I colored the images with Copic Markers and added Prisma pencils to add some detail. The sky was created with Pan Pastels using a cloud stencil from my stash.
For my tree, I kept a background made with Ken Oliver Color Bursts and used a My Favorite Things tree die for the branch. I then took white flowers and colored them in the same Copic’s used for my image, then added gems.
We’d love for you to visit our Facebook Community Page where you can post your creations in addition to adding them on the blog. Adding flowers is a fun way to embellish your projects and I look forward to seeing your creations this week.
From The Heart Stamps – Mid-Week Inspiration
Happy Wednesday. Today I’m posting some Mid-Week Inspiration for From The Heart Stamps. This new “Dancing Snowman” image is FABULOUS. Could be because I love to dance to loud music when no on is watching, but either way, he’s a breeze to color up and is perfect for bringing joy.
I die cut a frame from the My Favorite Things circle frame die using American Crafts “Valentine” paper. I then popped up the frame using foam tape. For the snow, I added Stampendous “Shaved Ice” that was added with matte medium. For some sparkle, I added a technique Ruth, also on the FTHS design team uses and edged the card with stickles. I love that shine, Thanks Ruth! Finally, I added the perfect sentiment that comes with the image.

I look forward to seeing you over at From The Heart Stamps Community both on the blog and on Facebook.
The House That Stamps Built: Sketch Challenge
It’s the fourth Wednesday of the Month and time for The House That Stamps Built sketch challenge. You have until Tuesday, March 1st to enter for a chance to win a $25.00 gift certificate at Repeat Impressions.
Here’s the Sketch:

For my card today I stamped Repeat Impressions “Peaches 504-L” with Momento Tuxedo Black ink in preparation for Copic Coloring. For my sentiment I chose to use only part of a sentiment from the “Quartet Compliment Plate 8600.” I finished off the card with some enamel dots.

I hope you’ll join us at The House That Stamps Built, for our sketch challenge because you may be our next winner!
Oh, and don’t forget to get your discount code from my blogs sidebar when you shop at Repeat Impressions Stamps.
Send a Smile 4 Kids – #119 Anything Goes Challenge!
Happy Saturday! Today Send a Smile 4 Kids begins a new Anything Goes Challenge! We have a great prize being offered for our randomly chosen winner. The design team will also be choosing their favorites and those cards will be featured on the Send a Smile 4 Kids blog.
Our sponsor this week is:
1) The Cutting Cafe: Prize 3 sets of digital images or cutting files
My card today uses Ice Cream Shaker which is provided in both sugar and cake cones for the fabulous price of $1.99! The template provided can be either hand cut as I did, or you can use you die cutting machine.
I began by printing out the ice cream in some beautiful pink card stock which I stamped with the Simon Says Stamp Cupcake Party stamp. I used the sequins from the Hero Arts kit and the ribbon from Bazzill. Finally, my sentiment is die cut from Papertrey Ink using card stock.

We hope you will join us at Send a Smile 4 Kids this challenge for a chance to win some great prizes in our Anything Goes Challenge!
A Day For Daisies: A Child’s World Showcase
It’s Friday and today at A Day For Daisies we are showcasing “It’s A Child’s World.” Sweet, sweet images with children playing and having a glorious youth-filled adventure. Our “add wood” challenge will continue through Thursday, February 25th.
For my image today I used “Magical Wood Margaret Evans Price Style.” My Twinkling H2o’s needed a little love, so I colored with them on kraft card stock. I loved the embossing I put on my card a few weeks ago so I tried a different folder for this image and like this too. What do you think?

We look forward to seeing you at both A Day For Daisies Blog and Facebook Community Page!
Coffee Anyone?
Hello Junkies!
The Crafty Nurse here with more inspiration using the February Technique Junkies release. I am a coffee JUNKIE! Starbucks to be specific. I’ve also found a really cool treat called “Topperfino.” They are little chocolate discs that you put in your coffee that are actually pieces of art. They are only 25 calories and so beautiful to look at. The best thing is it combines both my loves, art and coffee.
Now on to my card. I used “Drinking and Thinking SD656 with the Acrylic Gesso Tutorial from the Artistic Effects CD. To add a little pizazz, I added book paper under the gesso, then stamped my image. In addition, I took “Kona” Velvet by Art Anthology and framed my stamped image.
I liked the versatility of this stamp so didn’t even give her a sentiment. Pick up a cup of coffee, add a Topperfino and stop by Technique Junkies to pick up some great supplies!

I hope you’ve been enjoying some of the inspiration using the February release.
Happy Crafting!