The House That Stamps Built; Project of the week: 6-8-15
Hello stampers! Kathy, The Crafty Nurse here. It’s my week for The House that Stamps Built project of the week! I don’t know about you but I love the look of splatter on my cards and art journal pages. Sometimes it can be scary to add black splatter on your finished projects so I want to go through 10 ways I’ve learned to create a variety of splatter goodness.
Lets get started!
For this project the supplies I used are:
- Multiple Brushes – #2 liner, #4 Fan Blender, #8 Round, a water brush, tooth brush, and a basting brush
- Water Bottle
- India Ink
- Distress Paint and/or Acrylic Paint,
- Lindy’s Stamp Gang Magical Mica’s
- Mist of any type – I used Glimmer Mist in Black Magic
- Distress Pen in Black Soot with Spritzer Tool
- Watercolors
- Reinkers
- Plastic surface or acrylic block
- Paper – I used 140 lb Watercolor but you can use your favorite.
- Repeat Impressions Stamps of your choice, I used: 9706-U, Flowers, and 5806-H Happiness

The great thing about making spatter marks on your page is that you can vary the size of the “splat” based on the tool you use, the firmness of your tap on the brush, and the type of ink you use. Please remember, if you plan on adding any other inks or mediums to your project after your splatters, please use a permanent ink, such as India Ink.
Again, the tutorial will give you specific combinations of ink and tool, but they are all interchangeable. The technique is basic. Simply load and tap the brush. You want to be about 6 inches above your project and tap gently. The harder you tap, the larger the splats. Let’s get to splatting!

Technique #1: Gelato Splat
Begin by scribbling on a non-porous surface such as a plastic top or an acrylic block with your gelato. Spritz with water until it’s a loose consistency (pic on right). I always test off my project first. For this example I am using a #8 brush which provides a rather large splat.


Technique #2: India Ink Splat
This is my favorite combination. The india ink does NOT require any additional water, is a vibrant and with a #2 liner brush, makes a fine small splatter.

Technique #3: India Ink Direct Splat
This is a very bold splat and one I use in my art journal. To create this, pull up the ink using the dropper and simply flick it across your project without squeezing the plunger. This makes long “painty” type splats.

Technique #4: Distress Paint Splat
Distress Paint is good to use because it’s thinner than most acrylic paint. I do add a small amount of water to loosen it a little more, but not too much. For this example, I used a fan brush which makes clustered splats that are medium in size. You can move the brush around so it is vertical to the paper and would get less clustering.

Technique #5: Basted Splats
This is a fun tool used for basting food though once used in paint, it should be dedicated to your craft room. I used traditional acrylic paint mixed with a small spritz of water and flicked. The splats are a bit bigger but you get good range.

Technique #6 – Magical Mica Splat
I used Lindy’s Stamp Gang Magical Mica for this technique but you can use any type of mica powder, perfect pearl or dry colorant. I also used a water brush which comes in small, medium and large. This is the small brush, thus creating small splats. You can see that the ink is more translucent and not as vibrant as the india ink, but sometimes that is exactly what you need.

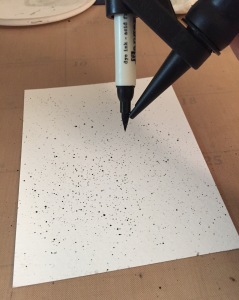
Technique #7: Distress Marker Splats
This tool has been around for years through Stampin’ up but last year was redistributed by Ranger. You can use the Distress Markers but be warned this is water soluble ink and if you plan on adding anything else over the top of your project such as matte medium or other inks……IT WILL RUN (ask me how I know). The good thing is you can use other markers such as sharpies or Faber Castell Pitt Pens in the same tool and create a permanent splat. The thing I do really like about this tool is it makes super fine splats.
Technique #8: Watercolor Splat
Same as the distress ink, watercolor is not permanent but does make an excellent option. I’ve again used the #8 brush adding a small amount of water to loosen the watercolor.

Technique #9: Misty Splats
Using Mists of any kind is another fun way to get splats on your page. Simply shake the bottle, remove the cap and tap directly onto your project. Based on the height and force you use will vary the size of the splats. This is also a great way to add colored splats.

Technique #10: Toothbrush Splats
I thinned out distress ink with water and dipped the toothbrush in. Taking your thumb, drag across the bristles slowly creating a fine mist. This one gets a bit messy so if you like, you can wear gloves.

Well, I hope you’ve enjoyed my 10 ways to put splatter on your projects and give a few a try. Please join us in the weekly challenges here at The House That Stamps Built for your chance at a $25.00 gift certificate.
I’ll leave you with my final project using Technique #2, India Ink and with a liner brush. After stamping the Repeat Impressions “Flowers 9706-U” image I watered colored the piece with Dylusions Ink.
I wish you a wonderful rest of the week!

The Crafty Nurse
Entered in:
Posted on June 8, 2015, in Repeat Impressions and tagged Glitz Paper, Momento Tuxedo Black Ink, Repeat Impressions Stamps, Sharpie Markers, Simon Says Stamp Die. Bookmark the permalink. 9 Comments.


Great information and a lovely card!
LikeLike
This was fascinating! I am a rookie at doing this, but think I will do more and more now!
LikeLike
Glad you enjoyed!
LikeLike
Such a great show of different splattering techniques
LikeLike
Thanks for the comparisons! Fab card!!
LikeLike
You are having so much fun! Love the descriptions and comparisons – though I’m still afraid of black. Love the card. The cream color with the red and blue flowers are just plain HAPPY!.Good luck in the Design Team Showcase challenge!
LikeLike
Love how you created the background and the finished project is awesome! Thank you for entering Design Team Showcase.
Kim
{Craftisan Studios}
Design Team Showcase
LikeLike
wonderful projects!
Thanks for playing along in the Design Team Showcase.
Hugs,
Natalie
LikeLike
Pingback: Lindy’s Stamp Gang June Color Challenge | The Crafty Nurse